Wednesday, November 19, 2008

Crazy Quilt Round Robbin 1st Block

Alright, almost 2 weeks since i've posted - wow!  Still kinda tapped out but I have been feeling the urges to post here, i've just been lazy! 

As I posted earlier I am in the HGTV CQ Round Robbin.  My first one and I was scared to death to join!  I mean - really - what if I messed up someone's block after people had worked countless HOURS on it?!  But ya know what?  Once you get that block, it's not the same feeling.  The block speaks and you just work... They really do talk and it's SO much fun!  I'll never second guess joining a CQ RR again that's for sure!!!

First up I got EMB's block.  Her theme was butterflies.  I wish I could post more but I can only show you my 2 sneek peaks that I showed her.  I will also show you her block as I received it bare.

Here I tatted the "E" and added some silk ribbon embroidery over it.

Here, I added the lace with the beads and a little "heart flower" then the beaded silk ribbon.
Fun, fun, fun!  Next up is fishingwidow's block.  It's here and I already have some ideas 'drawn' out ;)  Stay tuned!

Saturday, November 8, 2008

Creativly Tapped Out

For the past week, maybe almost 2 now, i have just been creativly tapped out.  I stare at all of my CQ projects as if I have never touched one in my life.  I lay out beads and lace and this and that and nothing comes to mind.  I'd hate to say I'm 'depressed' because that just makes me feel even worse.  I'm not quite sure what to think.  My friend Kathy has sent me some e-mails today to help me with some ideas and they were great, I sat down to stitch and just couldn't.  Needle in hand and I just stare... I don't know what to do or what to make of things at this point but it's really disappointing.  ugh!  This is a bad slump to be in, my projects are really what keeps me going!

I've been looking for a fellow tatter in New Jersey to tutor me in shuttle tatting because my flip keeps getting messed up.  I've put out those tear off flyers in the local supermarkets, looking for shuttle tatting tutor $15/hr., still nothing.  I have put ads on craigslist, nothing. 

So frustrating!

Friday, October 31, 2008

And The Winner for the CQ Give-a-way is...

wow, all I can say is this girl must've been sending out some serious energy LOL i knew she wanted this pretty bad!  I mixed up the names, shook them up, flipped them and then Allan picked her right out. . . and announced. . .


Congrats!  Stay tuned girls, i'll be doing another one in a few weeks!

Thursday, October 23, 2008

Watercolor Portrait Give-A-Way!

Wow, now wouldn't this be amazing to win?!   

She is offering this:

"This giveaway is for a portrait of one child or infant. 

I will paint the portrait from a photograph supplied by the winner. The size of the portrait will be 9.5" x 11" and is painted using quality materials. "

Wednesday, October 22, 2008

Tatted Monograms


I love monograms.   Love, love, love them!  Well whaddya know, in the mail a couple days ago I get this book from my friend Lois.   It's dated 1949.  Ok let's address that to begin with, i love history. . . you couldn't get me to love it in high school but now I cannot get enough of it!  Reading the ads is so much fun and it's so amazing.  Allan and I just wonder what the kids 2 generations from now will think of all the fancy stuff advertised now!  Great reading.  "earn as much as $5/hr!" We don't even think it's funny in the laughing sense but truly interesting!

Ok, now inside this book is a group of patterns for shuttle tatted (come on guess....) Yep!  Letters!  She wondered if I could convert them to needle patterns. . . well i've learned that it's actually pretty easy, in shuttle tatting when you close the ring or end the chain you don't reverse, in needle tatting, you just add the reverse most of the time.  So the "E" was the first initial I came up with, I can't tell you why right now though, that is for a later blog ;)  Then the L which is my favorite, it reminds me of "Laverne and Shirley" for some reason.  (Jim Vallely who was the write and producer also did the Golden Girls, I adore them, was watching them the other night) and then the S, which looks a bit wonky but since it's detached it has to really be sewn into place.  Maybe I could alter the pattern a bit to make it a bit more fancy.   Crazy quilts, here these gals come!  These are a lot of fun, I hope to work up the whole alphabet soon!  . . . and you know i'll be back with pictures don't you? ;)


Monday, October 20, 2008

CQ Heart Tutorial

My friend Jane_Kiwi was asking about the CQ Heart process so i did this little "step by step tutorial" :)  

First, print out the heart template: CQ Heart Template [click here]  

1st: Cut out the heart and trace the pattern onto muslin.  


--  

2: Choose your center fabric. A 4 or 5 sided piece is usually best, this will allow for more fabrics along the edges. I have chosen a sheer fabric, so i have a solid piece under it, which is why you see 2 fabrics there. I work with the traced side of the heart face down, but you can see the heart because the pen bleeds thru the other side. 


--  

3. Choose a 2nd fabric and pin it to the first fabric matching the edges, then pin to keep in place. Notice i have made 2 small marks where the first fabric begins and ends. This is just to show you where you will begin and end stitching. 

 
--  

4. Stitch fabrics together, clip loose threads. Then press open. I use a loose piece of muslin i have laying around to cover the fancy fabrics so they don't get scorched :)

 
--  

5. Cut away the excess fabric (where the green extends beyond the white fabric) and pin and stitch down your next piece of fabric. Continue to cut away any fabric that is more than 1/4 past your seam. 


--  

6. Continue to piece around in a clockwise or counter clockwise around the center piece. Pin as you go to keep your fabrics from slipping and sliding all over.

 
--  

Just showing the progression of the piecing until the final piece of fabric is done... The nice thing about doing the hearts is that 4-6 pieces of fabric will be all you need. They're a great beginner piece. 


--  

Now that all of the heart has been covered, here is what the front looks like (certainly doesn't look like a heart!) 


-- 

This is what the back looks like. 


--  

Now how you go from here will be your own personal preference. You can cut away the excess fabric, baste the edges, then zig zag and go from there. I like to baste before i cut away the excess fabric. I lie my heart right side down onto the feed dogs and machine baste with my largest stitch. I baste first so that as i'm cutting pieces of fabric aren't flopping all in front of my scissors and it also holds the fabric safe and securely. I've accidentally cut into the fabric i'd be embellishing because it was flopping all over while cutting. So with the back side up so i can see my tracing lines, i baste about 1/3" inside. 


--  

Cut away excess fabrics. Cut exactly along the traced line.  

The basting along the edges is put there as a reminder NOT to embellish past that. If you start stitching buttons and beads there, when you go to sew them down to something or what have you, your needle will come in contact with the embellishments and well... i will leave you to imagine the rest 


--  

Lastly, zigzag or serge your edges so that they do not fray like crazy as you embellish them! And you have your heart! Great Job! 


© Copyright 2008 The Talia Effect 
Reprint Permissions Policy:  
You may reproduce or copy this page in print for non-commercial, non-profit teaching and educational use only. Proper acknowledgement must be given to The Talia Effect for any material reprinted.

Saturday, October 18, 2008

"Think Girly" Order Up!


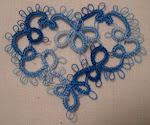
'The mad tatter' as I like to think of myself was at it again at the request of my friend Sherry.  She had contacted me to make her some tatted goods for a CQ block she was going to be embellishing.  "Think girly" she says, and that is all she says. . . So, i thought girly with the butterfly and clover leaf heart, and then the ecru 80wt tatted basket was where 'delicate girly and dainty' came to mind ;)  

I love the clover leaf hearts.  They are so beautiful.  I look forward to the day i learn to shuttle tatt though because needle tatting tends to work things up larger, a lot larger than shuttle tatting would.  With needle tatting you have to rely on working the thread on the needle.  With shuttle tatting you work the piece on only the thread, so it's only as wide as the thread, and with 80wt, that is pretty small!  Regardless, they came out pretty and I love them!  Once all dressed up for a night out on the town, I think they'll be dazzling and whimsical!